This is my rendition of a Christmas bird. Trust me, it's one of a kind. I tried several ideas out on this little birdie while in the process. For instance, I added quilted fabric to his body. I found an old pillow sham which was sacrificed for the cause. Also I dipped into my vast collection of bird feathers and used those to embellish the breast. I created a makeshift piping bag from a plastic storage bag and piped the branch with modeling paste. I used my waxed paper faux batik technique to make the leaves and the tail and wing feathers. Walnut ink was used to tone the waxed paper rather than India ink and the background was also toned with walnut ink. Hope you like. I like it.
Translate
Showing posts with label faux batik. Show all posts
Sunday, December 11, 2016
Christmas Bird ~ mixed media
This is my rendition of a Christmas bird. Trust me, it's one of a kind. I tried several ideas out on this little birdie while in the process. For instance, I added quilted fabric to his body. I found an old pillow sham which was sacrificed for the cause. Also I dipped into my vast collection of bird feathers and used those to embellish the breast. I created a makeshift piping bag from a plastic storage bag and piped the branch with modeling paste. I used my waxed paper faux batik technique to make the leaves and the tail and wing feathers. Walnut ink was used to tone the waxed paper rather than India ink and the background was also toned with walnut ink. Hope you like. I like it.
Wednesday, December 18, 2013
A Faux Batik Xmas
Occasionally I will paint individual cards for Xmas. I find them labor intensive so I have to be in the mood and this year I'm in the mood. I decided to stick with my alcohol ink batik technique for a welcome change. These are not folding cards so I've used Yupo as my backing substrate. I'll be writing my message on the back of each card with Micron pen so they will need a coat of Krylon spray varnish to eliminate any smearing. I could not find my white fluid acrylic paint to create the snowy candy canes so I used White-out. It worked great but I had a devil of a time washing it out of my spatter brush. Here are a couple of my faves.
Friday, December 13, 2013
Pecking Order ~ complete
I mounted this on 144# Yupo two days ago but had to wait to get a photograph. The weather finally broke long enough to allow me to capture a decent photo of this piece. I took it outside today on a bright hazy, 5 degree F day...perfect for photographing art. Well, the temp wasn't perfect but tolerable and the lighting couldn't have been better. I added a digital 'frame' with my photo editor. The final dimensions are approx. 11" x 18". Hope you like!
Note: My photo reference was courtesy of Sharon Whitley on Paint My Photo.
Labels:
alcohol ink,
chickens,
faux batik,
roosters,
walnut ink,
waxed paper,
work in progress completed,
Yupo
Tuesday, December 10, 2013
Pecking Order ~ WIP 3
Sorry for yet another bad image. Between our dark days and the shine of the alcohol inks I'm having a devil of a time photographing this piece. Suffice it to say, it looks a whole lot better IRL. I'm just about ready to mount this on Yupo and give it a few coats of varnish but I thought I'd post it at this stage to show how it looks before I work out the puffiness with a brayer. I like that quilted effect for some subjects but not this one. I'll be using Mod Podge to adhere it to the Yupo. Mod Podge works very well because it stays tacky long enough to make adjustments before it dries.
I just noticed I may have missed a toe on one of the roosters. I also have a few areas that need to be lifted (colors that bled or accidently landed in the wrong spot). Hopefully I'll be able to take care of that with a Q-tip and blending solution.
Labels:
alcohol ink,
chickens,
faux batik,
roosters,
walnut ink,
waxed paper,
work in progress
Sunday, December 08, 2013
Pecking Order ~ WIP 2
![]() |
| With flash |
![]() |
| Without flash |
I'm trying to spend just a few hours at a time working on this to avoid breathing too many fumes but it's really difficult when I get in the zone. I've got the chickens finished but it's hard to tell from these images. I tried photographing twice, once with and once without flash and got varying results, neither of which turned out well. I used Ranger's Pearl mixative on the white chickens and the flash lit the ink up like crazy because this particular ink contains iridescent particles. Without flash the painting looks dull but the quilted effect from the waxed paper is less apparent. I decided I'm going to post both images because with all these gloomy days(and no sun predicted in the foreseeable future) I doubt I'll be able to do better before the painting is done.
Labels:
alcohol ink,
chickens,
faux batik,
pearl mixative,
Ranger ink,
roosters,
waxed paper,
work in progress
Saturday, December 07, 2013
Pecking Order ~ WIP 1
'Pecking Order' is my working title for now. At least until I can come up with something better. My photo reference came from Sharon Whitley on PMP. This will be the largest faux batik I've done to date. I don't have the final measurements but will post them later. I took a quick photo when the clouds tried to part for a moment but the image could be better.
Instead of India ink I've used walnut ink to prime my waxed paper before applying the alcohol inks. Walnut ink tones the entire surface a nice shade of sepia and I love that look for certain subjects. FYI, for anyone that wants to try my faux batik technique , any shade of India type ink can be used. Because there is so much small detail in this drawing I taped my drawing directly under the waxed paper so all the lines would be visible, then added a layer of clear plastic wrap between the drawing and the waxed paper. There will be bleed through when the alcohol ink goes on and I wanted to protect my drawing. I've been battling lung issues more so than usual lately so I hope this comes together nicely and I tolerate the fumes well. We'll see.
Labels:
alcohol ink,
chickens,
faux batik,
roosters,
walnut ink,
waxed paper,
work in progress
Friday, September 27, 2013
Barnyard Gothic ~ faux batik on waxed paper
The CEO is back for an encore. This time he's painted as a faux batik on waxed paper. I replaced the India ink with walnut ink and it toned the waxed paper so well I didn't bother painting a background. I'm not sure where I got the title but it seemed to fit somehow. Maybe because the walnut ink lends an antique affect to the painting.
Labels:
alcohol ink,
faux batik,
Rooster,
walnut ink,
waxed paper
Sunday, June 23, 2013
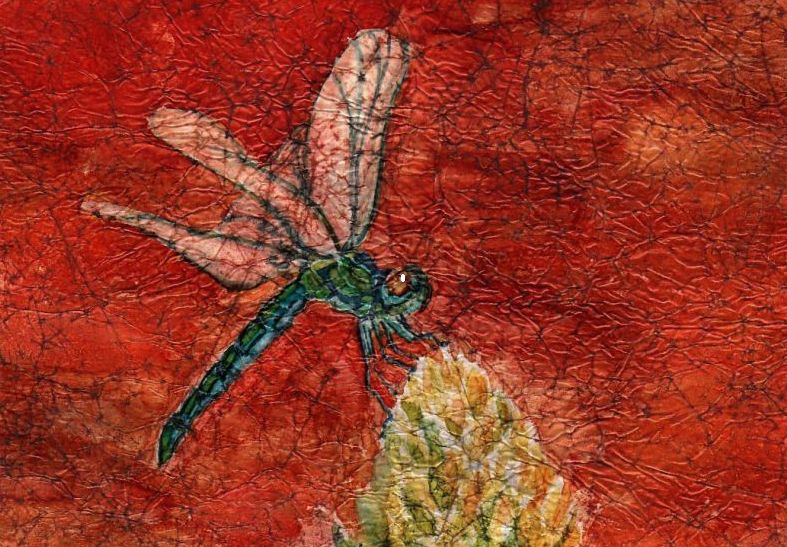
Willow Emerald ~ alcohol ink faux batik
SOLD
After much tweaking I'm calling this damselfly done. It's a Willow Emerald and my reference photo was courtesy of Paul Sherman from PMP. Lots of teeny tiny detail work (read time consuming) but it looks pretty darn good IRL. Scans don't always tell the true tale, even after much adjusting in a photo editor. It's only 5"x 7" so I was just about cross-eyed afterward. To take a break I started what I hope may be a small series titled 'Roots'. I'm painting directly on the Yupo with Ranger alcohol ink, allowing the inks to do their thing with a little help from a bamboo skewer here and there. I'll be posting some of my results soon. Stay tuned....
Labels:
alcohol ink,
damselfly,
dragonfly,
faux batik,
waxed paper,
Yupo
Tuesday, May 07, 2013
Faux Batik Sunflower 2
I chose to revisit Faux Batik Sunflower using a different palette of colors. Also I used walnut ink in place of India ink during the process. The walnut ink toned the entire piece of waxed paper and gave it an antiqued look which, of course I totally obliterated with my color choices. Next time I will work with the result and not against it.
Next post: I will show you how to make stencils with 90# cardstock and Mod Podge.
Labels:
alcohol ink,
faux batik,
sunflower,
walnut ink,
waxed paper,
Yupo
Tuesday, April 30, 2013
Krylon 'Make It Acid Free'
I have had questions put to me and my own concerns about working with alcohol ink on waxed paper. How archival could these paintings be? From my online searches the coating wax is described as purified paraffin but I can find nothing about the paper that is used in the process. Is it acid free? Probably not and because I crumple the paper to expose it I felt I needed to address this issue. I found Krylon's 'Make It Acid Free' spray
, (link) available at Dick Blick or Jerry's Artarama in the US. I crumpled my paper, then treated both sides with this spray before applying the inks. I found no difference in the way the inks reacted on the treated waxed paper and feel much better about the longevity of my faux batik ink paintings.
Labels:
acid free,
alcohol ink,
faux batik,
krylon spray,
waxed paper
Sunday, April 28, 2013
Back to the Inks
Butterfly I
5" x 7"
April 2013 has not been a productive month for me. I managed to create more paintings than usual, all of which landed in File 13. It seems that not only trying a new style but also a new subject has proved folly for me. I had hopes of whipping up a Shirley Trevena style still life but that didn't happen. In the meantime a laundry list of to-dos was piling up behind me so I had to stop and take care of business. I didn't expect to lose Digby either but it happened and I've needed a few days to grieve. It really threw me for a loop to be honest. Maybe as I get older these things hit harder.
Art is good therapy so I got out the one medium that gives me the most pleasure at the moment and painted this butterfly using my faux batik technique .
Note: My reference photo was courtesy of Veronique on Paint My Photo.
Labels:
alcohol ink,
butterfly,
faux batik,
Micron pen,
speedball ink,
waxed paper,
Yupo
Wednesday, January 16, 2013
Faux Batik Sunflower
SOLD
This will be my last alcohol ink painting for awhile, probably until Spring. The alcohol has begun affecting my throat and I fear it will also affect my lungs if I continue. Winter is not a good time for me to be working with strong fumes w/o proper ventilation and opening a window in the weather we're experiencing right now wouldn't be prudent. I will be picking up my watercolor brushes again and I have a few references that I've been anxious to get started on. Still, I will miss working with the inks. They are just so darn addictive.
Labels:
alcohol ink,
faux batik,
sunflowers,
waxed paper
Sunday, January 13, 2013
Batik Dragonfly ~ alcohol ink on waxed paper
SOLD
Instead of using India ink, I thinned black Speedball printer ink with tap water to a heavy cream consistency and used that in it's place. I think I like the Speedball ink better and it's far more economical. One heaping teaspoon of Speedball made a lot of ink.
Labels:
alcohol ink,
dragonfly,
faux batik,
speedball ink,
waxed paper
Wednesday, January 09, 2013
Demo ~ faux batik on waxed paper w/alcohol ink
I've received requests to post a demonstration of this technique. I had hopes of doing a video demo but the image quality of the test videos I ran with my current camera weren't the greatest so I've done a photo demo instead.
1.) I suggest you cut your waxed paper no more than 1"- 1 1/2" larger than your backing paper. The backing paper is the substrate you'll be gluing your finished batik onto.
2.) Crumple the waxed paper into a ball, smooth it out, then crumple once more. You want the little creases evenly distributed across your paper. Try to avoid long, straight creases.
3.) Image no. 3 shows the amount of crumpling I prefer.
4.) Ready for the India Ink. I use black India ink(full strength) and an old, stiff bristle brush to spread the ink. I suggest working on two layers of waxed paper underneath your painting to protect your work surface as the alcohol ink will bleed through. One tip: Slip a piece of white paper cut the size of your finished painting underneath both layers of protective waxed paper so you have a size guideline.
5.) The India ink has been spread out and at this point I wait a few minutes to allow the ink to settle into the creases before wiping away the excess with plain water and paper towels. As you can probably see, I also use my fingers to work the black ink into the creases.
6./7./7.1) A few views of the waxed paper after the excess ink has been wiped away. In view #7 you can see I slid a piece of 5" x 7" paper underneath so I know where the borders of my finished painting will be.
8.) If you choose a drawing to use for the painting it can also be placed underneath the waxed paper so it's visible. I used a black Micron .o8 pen to go over all my lines so they were easier to see.
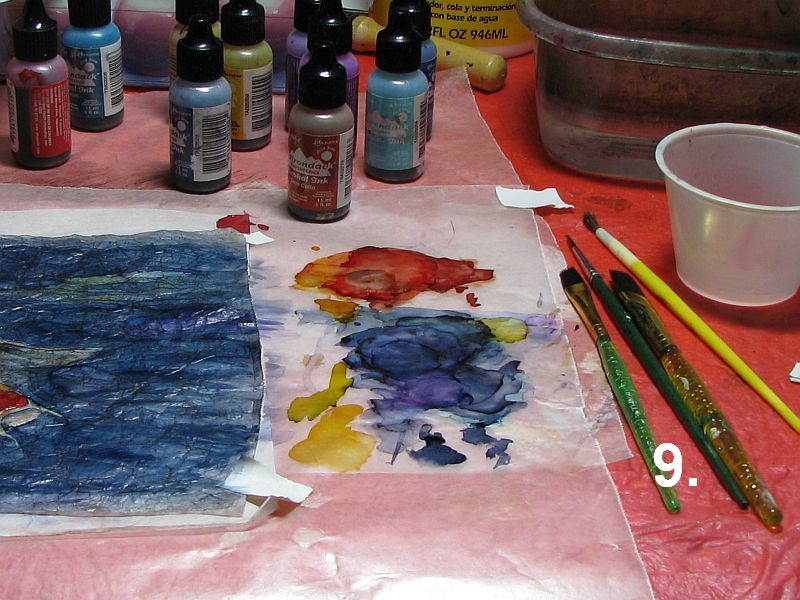
9.) Once I'm ready to paint, I place a small bowl of rubbing alcohol and another of clean water nearby to wash my brushes after each use. Also for cleaning brushes when switching colors. I mix my own colors by dropping the alcohol inks onto the protective waxed paper and picking the ink up with my brush. Use inexpensive brushes for these paintings as alcohol ink isn't very healthy for your good sables, etc.
10.) My painting is now finished and is ready to be glued to the backing paper.
11.) I apply Mod Podge with an old brush to the backing paper(in this case, a piece of Yupo) in a thin, even coat...
12.) and position my painting over the Yupo, making sure it's placed exactly where I want it. Then I use a soft brayer to press it into the glue, working out any trapped air bubbles. I also check for any places that may need another dab of glue, usually the corners. Lastly, I use a pair of scissors to trim away the excess waxed paper and the painting is complete.
NOTE: The koi fish painting has been sold.
Labels:
alcohol ink,
brayer,
demo,
faux batik,
India ink,
koi fish,
Mod Podge,
waxed paper
Saturday, January 05, 2013
Faux Batik Tulips ~ alcohol ink on waxed paper
Here's my latest 'batik' painting. This time I tried a floral. Just some simple pink tulips and their foliage. I'm working small...all are approx. 5" x 7". I haven't mounted this one yet but I may try adhering it to Yupo rather than w/c paper this time. The w/c paper had a tendency to buckle from the moisture in the Mod Podge. I plan to do a photo demo of this technique for my next post.
Wednesday, January 02, 2013
Alcohol Ink on Waxed Paper ~ faux batik
I wanted to create a batik-like effect for this painting so I used crumpled waxed paper for this purpose. After crumpling the waxed paper I applied black India ink to one side, allowing the ink to settle into the 'crumples' before wiping away all the excess ink with plain water. When it was dry I flipped the paper over and used alcohol ink to create my painting. I then mounted it onto 140# hotpress w/c paper with Mod Podge, using a brayer to work out all the air bubbles. I'm calling this one 'Winter Aspens'.
Labels:
alcohol ink,
aspens,
brayer,
faux batik,
India ink,
landscape,
Mod Podge,
waxed paper
Subscribe to:
Posts (Atom)