Translate

Thursday, February 28, 2013

New Project, New Style?


For quite sometime I've admired the work of Shirley Trevena . Her style is colorful, expressive and delightfully/creatively free. She works a lot with watercolor but isn't afraid to mix it up a bit. I've spent the last few days studying her online gallery and I'm both inspired and challenged as a result. Last night I drew up a still life setting from imagination based on some of her works but today felt I should go through my photos and gather things that have meaning to me. I don't own gorgeous vases or have access to fresh flowers at the moment but I do have cats so they must be a part of my still life. I found a photo I took last Spring of Digby, my male cat catching some sun while I worked in my studio so I started a new sketch, using this image to begin.

Btw, don't pay any attention to that dirty window(photo) or the suncatcher that looks like a hubcap(sketch).

Monday, February 25, 2013

Daniel Smith Watercolors


Trying out some new colors today. New colors to me anyway. With my winnings from the DS art contest I purchased a few new watercolors that I've been anxious to use. I ordered DS Perinone Orange, DS Opera, DS Quin Burnt Scarlet among a few others. I took some inexpensive paper and banged out this silly little owl today.

Saturday, February 23, 2013

Red Hat Ladies 2 ~ complete


It took me as long to complete as to get started but it's done. I do need to clean up the right edge on the hat of the lady in the foreground, though. I just noticed that but I had to snap a photo while the light was right. It's been so gloomy here. The painting was actually finished yesterday. I'd like to say this one fought me all the way but I think a lot had to do with my mind set. I'm 'winter weary' and it shows in my work. I'm a moody artist, it seems and it's a fight to stay in the mood to paint at the moment.

Second image: made the corrections to the hat, added some Quin. gold spatter to the BG and signed it. Done!

Reference photos courtesy of Judy Wright on PaintMyPhoto

Saturday, February 16, 2013

Red Hat Ladies 2 ~ WIP 3


I've been pecking away at this one a bit everyday. I ran out of light before taking the photo so it's a little blurry. At least I hope that's the reason. My camera hasn't been taking the best photos lately and I really don't want to buy another at the moment.

Wednesday, February 13, 2013

Red Hat Ladies 2 ~ update


February has got me moving in slow-mo. I blame it on the winter doldrums. My momentum is down to a crawl. The drawing sat on my easel until we had a brief (1 hour) power outage just a few days ago so I was left with nothing else to do but get started on this painting. I think it would still be sitting there naked today if not for that event. Hopefully I can get this finished faster than it took to get it started.

Monday, February 04, 2013

Red Hat Ladies 2 ~ WIP


I've just started a second 'Red Hat Ladies' after running into a slight problem. I had planned on doing two separate portraits as companion pieces for the original RHL (link) but discovered the leftover illustration board wasn't large enough for my purpose. I had forgotten I cut a strip from one side to use for painting trials so was left with an odd sized, square-ish piece to work with. Normally I would've gone back to the alcohol inks until I found a solution but that isn't an option at the moment. Finally a lightbulb went on in my head and I came up with this composition. This is just a photo of my drawing on tracing paper and, once again, I realize how much I would dearly love to have a lightbox, especially when working with human faces. Capturing the correct facial expressions of these lovely ladies is crucial to this piece and freehanding was challenging but I tried to keep it to a minimum. I'm really posting this so I can see it online to see if it 'works'. I invite my visitors to feel free to chime in with their opinions.

Friday, January 25, 2013

Cat Makes Daniel Smith Cover


Well, I'll be darned. I entered  A Cat of Color in the Daniel Smith Annual Art contest back in late September 2012 and with the help of the voting public and especially friends who voted (you know who you are) I managed to win a place with the weekly winners, then the monthly winners and am now in the running for one of the annual prizes. The final judging won't be done by the public but by a judging panel. I am also excited to see an image of my entry on the cover of Daniel Smith's Spring catalog among a collection of other monthly winners. I'm not sure when the final judging will take place. Possibly May or June 2013. I'll just have to cross fingers and wait.

Friday, January 18, 2013

Another Doob Cat w/GIMP


When I'm stuck or between projects I love to play with Mr Doob ,a free online digital art program. This is my latest 'Doob Cat'. I'm getting better at drawing with my computer mouse. I'm also getting better using the editing tools in GIMP, a photo editing program that has many of the capabilities of Adobe Elements. GIMP is also available online for free download. The cat was 'drawn' in black on a white background with the various brushes/effects that Doob offers, saved to My Pictures and then opened in GIMP where I added color and more shape with GIMP's various tools and brushes. The first image is how my cat looked after I initially created it in Mr Doob. The second image is the results after adding color and effects with GIMP.  http://www.gimp.org/  (hot link)

Wednesday, January 16, 2013

Faux Batik Sunflower


SOLD


This will be my last alcohol ink painting for awhile, probably until Spring. The alcohol has begun affecting my throat and I fear it will also affect my lungs if I continue. Winter is not a good time for me to be working with strong fumes w/o proper ventilation and opening a window in the weather we're experiencing right now wouldn't be prudent. I will be picking up my watercolor brushes again and I have a few references that I've been anxious to get started on. Still, I will miss working with the inks. They are just so darn addictive.

Sunday, January 13, 2013

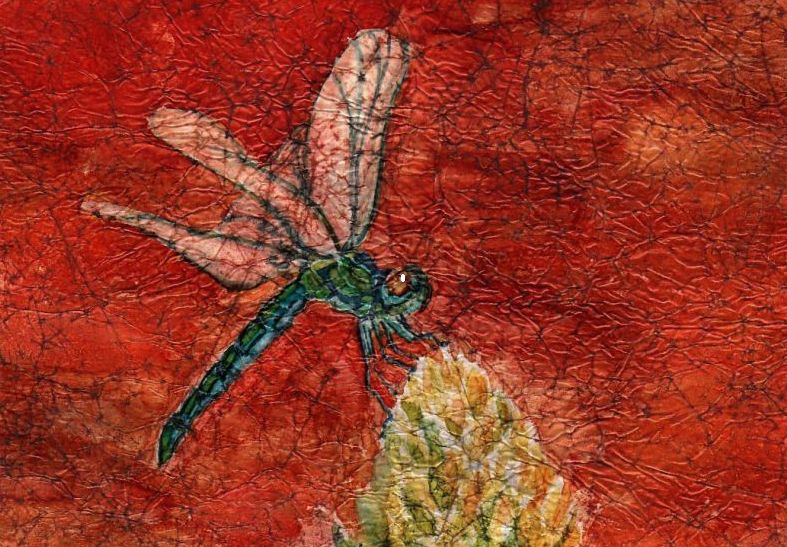
Batik Dragonfly ~ alcohol ink on waxed paper

SOLD


Instead of using India ink, I thinned black Speedball printer ink with tap water to a heavy cream consistency and used that in it's place. I think I like the Speedball ink better and it's far more economical. One heaping teaspoon of Speedball made a lot of ink.

Friday, January 11, 2013

Playing with Mr Doob Again...


I can't help it...it's so much fun. I created this little vignette of three sleeping cats with Mr Doob , then put it into Gimp photo editor and played some more. This is what I came up with on the fly. I really should start another painting but I've been too easily distracted today.

Wednesday, January 09, 2013

Demo ~ faux batik on waxed paper w/alcohol ink


I've received requests to post a demonstration of this technique. I had hopes of doing a video demo but the image quality of the test videos I ran with my current camera weren't the greatest so I've done a photo demo instead.

1.) I suggest you cut your waxed paper no more than 1"- 1 1/2" larger than your backing paper. The backing paper is the substrate you'll be gluing your finished batik onto. 

2.) Crumple the waxed paper into a ball, smooth it out, then crumple once more. You want the little creases evenly distributed across your paper. Try to avoid long, straight creases.

3.) Image no. 3 shows the amount of crumpling I prefer.

4.) Ready for the India Ink. I use black India ink(full strength) and an old, stiff bristle brush to spread the ink. I suggest working on two layers of waxed paper underneath your painting to protect your work surface as the alcohol ink will bleed through. One tip: Slip a piece of white paper cut the size of your finished painting underneath both layers of protective waxed paper so you have a size guideline.

5.) The India ink has been spread out and at this point I wait a few minutes to allow the ink to settle into the creases before wiping away the excess with plain water and paper towels. As you can probably see, I also use my fingers to work the black ink into the creases.

6./7./7.1) A few views of the waxed paper after the excess ink has been wiped away. In view #7 you can see I slid a piece of 5" x 7" paper underneath so I know where the borders of my finished painting will be.

8.) If you choose a drawing to use for the painting it can also be placed underneath the waxed paper so it's visible. I used a black Micron .o8 pen to go over all my lines so they were easier to see.

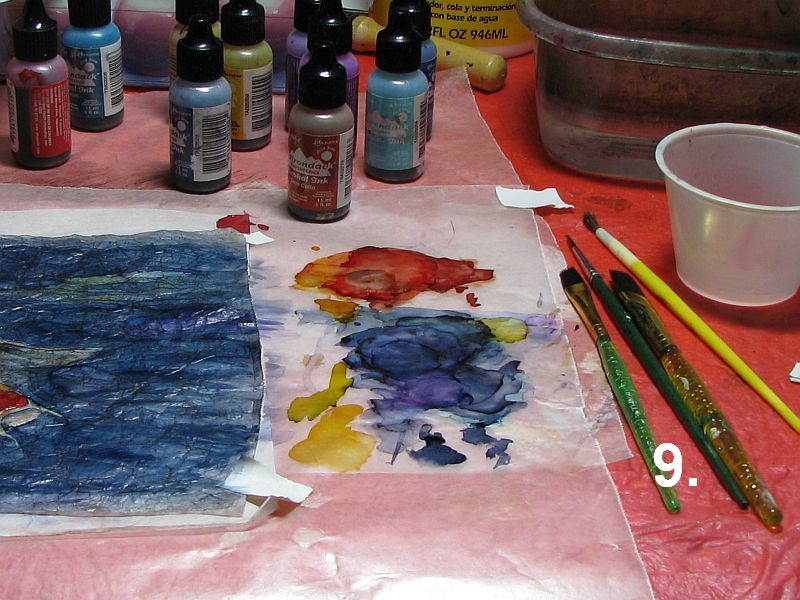
9.) Once I'm ready to paint, I place a small bowl of rubbing alcohol and another of clean water nearby to wash my brushes after each use. Also for cleaning brushes when switching colors. I mix my own colors by dropping the alcohol inks onto the protective waxed paper and picking the ink up with my brush. Use inexpensive brushes for these paintings as alcohol ink isn't very healthy for your good sables, etc.

10.) My painting is now finished and is ready to be glued to the backing paper.

11.) I apply Mod Podge with an old brush to the backing paper(in this case, a piece of Yupo) in a thin, even coat...

12.) and position my painting over the Yupo, making sure it's placed exactly where I want it. Then I use a soft brayer to press it into the glue, working out any trapped air bubbles. I also check for any places that may need another dab of glue, usually the corners. Lastly, I use a pair of scissors to trim away the excess waxed paper and the painting is complete.

NOTE: The koi fish painting has been sold.

Saturday, January 05, 2013

Faux Batik Tulips ~ alcohol ink on waxed paper


Here's my latest 'batik' painting. This time I tried a floral. Just some simple pink tulips and their foliage. I'm working small...all are approx. 5" x 7". I haven't mounted this one yet but I may try adhering it to Yupo rather than w/c paper this time. The w/c paper had a tendency to buckle from the moisture in the Mod Podge. I plan to do a photo demo of this technique for my next post.

Wednesday, January 02, 2013

Alcohol Ink on Waxed Paper ~ faux batik


I wanted to create a batik-like effect for this painting so I used crumpled waxed paper for this purpose. After crumpling the waxed paper I applied black India ink to one side, allowing the ink to settle into the 'crumples' before wiping away all the excess ink with plain water. When it was dry I flipped the paper over and used alcohol ink to create my painting. I then mounted it onto 140# hotpress w/c paper with Mod Podge, using a brayer to work out all the air bubbles. I'm calling this one 'Winter Aspens'.

Monday, December 31, 2012

Sunday, December 23, 2012

Sunday, December 16, 2012

Grove ~ alcohol ink on Yupo

SOLD

This may be my last ink painting for awhile. I have some wonderful references I'd like to paint in watercolor next. I'm fairly happy with this one although it could use a few tweaks. I also still have plans to make that video demonstration of alcohol ink painting but that will have to wait until the holidays have passed.

Friday, December 14, 2012

A Complicated Landscape~ alcohol ink on Yupo

SOLD


I spent a lot of time on this landscape because I had an image in mind when I began which isn't necessarily a good thing when working with these inks. They definitely have a mind of their own. You can build up fairly thick layers on the Yupo that can be manipulated with a bamboo skewer or brush, keeping in mind the less manipulation, the better the outcome. I finally received my 18 gauge oiler boiler which I filled with 70% alcohol and reworked the lake area in the foreground more than once to get the effect I was after.

Wednesday, December 12, 2012

A Simple Landscape ~ alcohol ink on Yupo


No ideas for a good title yet but I liked the movement in the sky. No need for a sun or moon this time.

Monday, December 10, 2012

Fantasy Forest ~ alcohol ink on Yupo


My latest ink painting. This time I went with a forest scene in vibrant colors to bring the fantasy. Creating the leaves and undergrowth is so easy with my trusty felt stamper.