Translate

Wednesday, May 20, 2009

Trillium Landscape~Comp Study 2

Better. Still needs work, though.
Ahhhh....no. Well, maybe. Ummmm....

I have a pour waiting for the finishing touches but for some reason I keep getting drawn back to this project. Having tried to get some advice on the Wetcanvas.com Composition & Design forum(which was not forthcoming, btw) I finally got several responses in the Watercolor Studio forum, a few of which were very helpful. Someone from the Landscape forum(where I also posted my comp/color study) dropped by in the w/c studio, which I thought was really nice, to offer suggestions. I think I'm on a mission here, folks. I am apparently bent on pulling off this landscape. Please forgive the odd squiggle or the eraser crumbs. I wanted to get this up on the screen to see where I need to make any changes...or just start over, whichever the case may be.
********************
The critiques I received on the original comp/color study so far...the title is misleading, the palette I used is too 'brown'(I think that means boring), my comp is still leading the viewer's eye off the left side of the painting, the center of focus(the trilliums) are too far to the right and down and there's a disconnect between the foreground and the background. My goal...create a composition that holds the viewer's eye and lets it move through the painting, to add more light and drama, put more focus on the main subject while maintaining my concept and get my COI(center of interest) in the correct spot. I'll deal with the palette later. If anyone stopping by has any more input I'm all ears...or rather, eyes.

Saturday, May 16, 2009

Trillium Landscape~Color Study


What started as a doodle became an all out quest. Like a dog with a bone, I've been obsessing over this study all day, every day since my last post. I'm clearly out to sea when it comes to painting landscapes. My friend & fellow artist, Anita Murphy wisely suggested I reduce the color values to suggest distance on the upslope of the hill, thereby creating more depth. It worked to a certain degree but I think I needed to vary my colors as well. Reduce the chroma, change the hue...whatever. I can now truly see why landscape artists prefer to paint plein air. I'm posting what I have at this point but think I'll set this one aside for the time being until I can educate myself more on what constitutes a really good landscape painting.

Wednesday, May 13, 2009

Just Doodling

It was brought to my attention(thank you, Margaret!)that my first composition was leading the viewer's eye off the left side of the picture. I agreed so I added a few bare twigged bushes in strategic places to bring the focus back into the main comp. I do believe that worked. It never hurts to get a second(or even third)opinion when creating a composition. Sometimes it can be the most obvious flaws that we(I)tend to miss.


I've been trying to come up with a composition for my trilliums without much luck. Who would've thought it would turn into such a chore. They're just trilliums...right? I finally started doodling in an old sketchbook I found(surprising what you find when you go rummaging)and came up with this idea. I really wasn't planning on including so much landscape but I kinda like this concept. As I mentioned in my previous post, the woods are very dry and the trilliums are in short supply this year. In fact, our local weather has been such that my own gardens are at least three weeks behind in terms of growth. A lone clump of trilliums blooming valiantly next to a piece of deadfall in a sea of dry leaves seemed to capture that sense of the promise of Spring to come.

Monday, May 11, 2009

Shooting Trilliums

This bloom, taken in closeup, would fit well into the second photo to give an opposing direction to the composition.
Here I've isolated an area of the photo below to highlight the left sweeping motion of these blooms.

This little cluster of trilliums held my interest the most. I love the shadows!


I took my camera into the woods today to get some shots of trilliums. Even though we've had rain the woods are still so dry and trilliums are sparse. I did manage to find some clusters and get a few nice photos for my trouble. I had planned on sketching too but the weather is so cool I decided to just snap pictures instead.
I made it to the hardware store today and bought two cans of metallic paint. One gold(enamel based) and one metallic aluminum which is oil based. The aluminum should be interesting. It looks like brushed stainless steel in the can but we shall see. I'm not sure how the enamel will work with watercolor or with my lungs. If I choose to incorporate the metallics into a painting I had better do it outdoors just in case.
My goal now is to determine what two or three features of trilliums draw me to them the most as subjects. I'm defying my own nature to seek out detail and instead try concentrating simply on form, color & shapes, to simplify my subject and break it down into it's most basic components. This should prove interesting.

Sunday, May 10, 2009

COLOURlovers Online


I stumbled onto COLOURlovers while browsing the web yesterday and thought it was interesting. I also thought it might be of interest to my fellow artists. This site follows global color trends in the marketing arena but it could be useful to artists as well in terms of providing fresh ideas for new palettes.

Friday, May 08, 2009

Here Comes The Sun~Flower


Here's another w/c on gesso I completed. I've just felt like playing around with texture and color lately. I want to get some metallic paint and try adding that to a painting on the gessoed matboard. I'm not talking about the artist brand metallics but the oil based metallic paints that you can purchase at the hardware store. I think it would be cool to get some silver or gold into the act. Ann Blockley did a beautiful vignette of snowdrops that appears in her book. Her palette consisted mainly of white, warm yellows and black with a bit of woodsy green. Then she added gold metallic oil based paint to areas of the background and the entire painting began to shine in more ways than one. I loved the effect!

Thursday, May 07, 2009

Frog On Gesso Completed


I tweaked this one until I was happy with it. I had a heck of a time photographing it and getting the color correct. Too much is cropped off the bottom because of camera distortion and the colors are a wee bit off. I started another w/c on gesso, changed my concept midstream and ran it off into the ditch somehow. Try, try again. I'm hoping with the rain we've been getting the trilliums will be up soon. I plan to do a little woodland sketching and maybe use trilliums in my next gessoed piece. Better yet, another pour.

Saturday, May 02, 2009

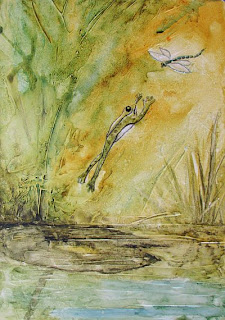
Frog & Dragonfly on Gesso


I came up with this concept on the fly(no pun intended)and decided to use a few colors I've been itchin' to try...Daniel Smith's Tiger's Eye Genuine and Undersea Green. I added Prussian blue, Quin. gold and Warm Sepia to the mix. I was going for a sunlit swampy/stagnant pond atmosphere. I discovered it's important to choose your watercolors wisely when working on gesso. I had an awful time with the paint lifting on this one when I tried to apply successive glazes, even when the previous layer was completely dry. I could probably take a wet rag and wipe this entire painting off right down to the white gesso. I knew both of the DS colors were very non-staining and the sepia and Tiger's Eye were easily liftable(is that a word?)so I shouldn't be surprised. I'll know next time to plan very well prior to painting when using these colors and make sure it's one pass only with the brush.
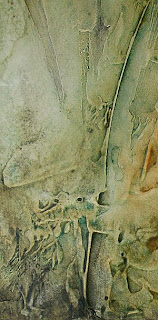
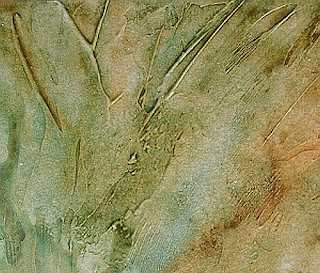
I included a few closeups of selected areas to highlight what I consider little 'gems' in the painting. The textural component of the gesso catches and traps the paint in such a way as to create fascinating, almost abstract passages that I absolutely love.

Thursday, April 30, 2009

Playing With Matboard & Gesso

The finished product consisting of my gessoed matboard and transparent watercolor
A stack of 3/16" matboard and my bottle of acrylic gesso ready to be applied


When I receive an order of precut mats from my online supplier they always include the matboard cutouts or 'centers' and I've accumulated quite a stack of them. Recently I purchased a small bottle of acrylic gesso and decided to give one of Ann Blockley's techniques a try. She uses gessoed mountboard but I wondered if I could use the leftover matboard instead.


I applied the acrylic gesso fairly thick with a brush, then created more texture using a palette knife and let it dry for 24 hours. The matboard buckled slightly at first but as it dried it flattened itself out nicely. Afterwards I had no idea what to paint so I did my version of the painting on her book cover which features dandelions going to seed. I used only transparent watercolor, drying the paint thoroughly after each application. I then scraped out the dandelion fluff and defined the stem with the fine nib of an ink pen. I was both pleased and impressed by the textural element I was able to bring to this painting due largely to the gesso. Also the way the paint moves and reacts on the gessoed surface was new to me.
Check out Ann Blockley's website at http://www.annblockley.com/index.htm

Tuesday, April 28, 2009

Trio Of Lady Slippers


I finally completed this one. Yes! However, I didn't get all my Spring cleaning done but I did make a big dent in it. I decided to give my studio a very thorough cleaning and now I can't find anything! Then we finally had a fairly warm day without rain so I knew I had better get busy and start cleaning out my many flower beds. I gave two huge stands of ornamental grass their Spring buzzcut and my neighbor came by with his leaf blower and saved me the trouble of raking my lawn. Thank you, Mark!


As for my lady slippers, I'm pretty happy with the result. I'd love to do another project featuring lady slippers using a different palette. I'm not a botanical artist by any means so these 'ladys' are unique. I added whatever flourishes to them I wanted to see with no regard for species. *Note: The bead of masking fluid I added along the edges of my artist tape failed in a few places and I did get some bleeding into the outer borders, mostly in the corners. I'll have to be more careful next time. I'd love to be able to float mount one of my poured florals but that calls for a pristine border around the painting so I hope I have better luck with that next time.

Sunday, April 19, 2009

Spring Cleaning }:(


I skipped this chore last Spring because I hate heavy house cleaning but the time has come to face the mess and tackle it head on. By the time I'm done for the day I'm in no mood to paint or anything else for that matter. I'll be finishing my orchids as soon as I'm done dusting those 'hard to reach' places, scrubbing, washing windows, throwing out numerous boxes I've saved for some unknown reason...the list goes on. I'd kill for a housekeeper right now.

Thursday, April 16, 2009

Watson Loves Flowers


While I was waiting for my son(what would I do without you, James!)to fix my computer, my youngest son and his girlfriend Jamie sent me a photo of Watson, their cat. Watson is one big cuddly sweetheart that obviously enjoys flowers. The photo was taken while I was at their home enjoying Easter dinner and I told them I'd love a copy. All my reference material is online so being without a computer had left me high and dry. Maybe I should consider painting plein air afterall? Anyway, it's been ages since I've done a graphite piece so I started doodling and this was the result. I ran out of steam drawing all that fur and all those flowers so I've decided to put this aside for the time being. I only wish I had chosen better paper but I grabbed the first pad I found. I'm sure I'll come back to this at some point because it needs some tweaking. And WOW...I had forgotten how labor intensive a detailed drawing can be!

Tuesday, April 14, 2009

Lady Slippers~Update 2


I did so many pours on this I've now got it down to a science. I kept pouring to increase the depth of color and introduce a warmer element...namely the purple. At one point I regreted adding the gamboge to the mix. It began to look muddy and I blamed it on the paint color. I switched from mauve to a mix of Quin. Rose added to my blues and kept pouring. Slowly the muddiness disappeared. I noticed that using the blowdryer on pours wasn't the way to go. They looked much better if left to dry naturally although the waiting is tedious. *Note: Always dry completely flat! Otherwise you get crawlbacks along the bottom where you don't want them* I debated whether to add foliage but the leaves of the lady slipper orchid are so textural and graceful they had to be in the painting.

I'm using Arches 140# HP taped to a board for this project. As you can see, it's still a little buckled but it smoothed itself out incredibly well after each dousing. I borrowed a tip from Nick Simmons and applied a thin bead of masking fluid along the inside edges of my masking tape so no paint could sneak under. I'll see how well that worked when this is completed. At this point I've removed the masking fluid on the painting itself and I'm ready to start work on the flowers. It's overcast today so the image looks a bit grey. I managed to preserve the warm pale turquoise in the upper left corner even though the photo doesn't show this.

Monday, April 13, 2009

Moonlit Haze


As you've probably guessed, I have a fascination with the Moon. Late last night the view out of my front window made me run for my camera and try to photograph the sight using the telephoto. So far I haven't had much luck using this particular feature but I did manage to capture the scene. It was hazy last night with the last full Moon on the wane. I've jokingly referred to these type of nights as 'Jack The Ripper Nights'...eerily beautiful with a sense of the dangerous. The Moon appeared as a hazy 'ball' glowing through the still bare trees across the drive. All that was missing was the silhouette of an owl perched on a branch. A cat would've been even better.

Friday, April 10, 2009

Lady Slippers~Quick Update


I did two pours last night on this one and it looks like I'll be doing a few more. I let it set overnight and looked at it with fresh eyes today. I see several changes I want to make already. I had a heck of a time deciding on a palette but because I hate wasting paint I used some of the leftover colors from East Meets West. I added Gamboge Hue to the Cad. Yellow Light and Indigo to the Indanthrene Blue. I also replaced the Quin. Rose with Mauve. I splattered, encouraged crawlbacks and generally had my way with this painting. I figured it'll either crash and burn or be beautiful. Only one way to find out...try it! I'm going for a very textural background. Not sure if I'll be adding leaves or not. This one is being planned as I go along. I'm letting the paint tell me what to do.

Monday, March 30, 2009

Mike's Cat~Done!


This one is finally completed. Yes! I've added the pastels and few other small details. I won't be able to have this one scanned because I used pearlescent paint on the fish and water splash. The mica in the paint would light up like a flash bulb but I just couldn't resist. It looks great IRL. I've photographed it myself and will copy to a CD for printing. Rachel, my print gal will have to make a few color corrections but my photo is pretty darn close. I lost a little of the yellow base color but I'm sure that can be recovered in PSP.


BTW, I'm looking for a title for this one. It'll always be Mike's Cat to me and of course, to Mike but I'm looking for something clever and more suitable. I'm open to suggestions!

Old Roses with Vase


This is one of my experiments that miraculously I didn't toss out. It pays to hang onto your 'failures' sometimes. I'd had this one taped to my plexi for a few weeks and almost threw it out last night. As I looked at it I thought of old roses in a mixed bouquet, well past their prime, their beauty slowly fading while the filler flowers and foliage forged onward. I quickly painted in a vase to 'hold' my old roses and Voila! Well, it's not exactly a triumph but I learned a lesson. It pays to hang onto perceived flops just in case they might become your next masterpiece.

Friday, March 27, 2009

Lady Slipper Composition


Even though I'm still adding the final touches to Mike's cat, I've decided I need to get started on my next floral. This time I've chosen Lady Slipper orchids and need to work out the composition. This is basically just scribbling on the back of an envelope with a ballpoint pen. I really should invest in a sketch book but somehow it never happens. I plan to pour the background and paint the orchids in more detail like East Meets West.

Thursday, March 26, 2009

I'm Thrilled With Imagekind!


After opening my gallery on Imagekind I thought it would be a good idea to order some samples just to check the quality of their prints. I was also concerned that the images I uploaded were 'ok' and printable. I wanted to see what customers would be getting if they ordered. I bought four assorted greeting cards and they arrived today. The quality couldn't be better. I've scanned one card showing the back and front. Each card came in it's own acetate sleeve w/envelope.

Mike's Cat Re-Do~Update


I've used Frisket film to mask the cat and Moon. I also made a template out of 90# card stock to use as a guide when cutting around the Moon with my exacto knife. The rest of the masking is done with masking fluid. The tape 'holds' my horizan line.
__________________________________________________________________

I've been working on Mike's cat for the last 5 days. This is when I'm reminded of just how fickle watercolor can be. What worked well the first time isn't cooperating this time. I remembered to mask in the stars and the cat's whiskers this time and I still need to paint the shadows/reflections of the cattails in the water. Then I'll be ready to add the pastels. I thought I'd post an update and include images of the process I'm using to create this particular piece. Sorry for that blurry image in the panorama but there's no going back now. Mike, I sure hope you like the changes!