Translate

Tuesday, August 31, 2010

Plotting a Painting of Peacock Orchids


I put the original photo into Irfanview, greyscaled it, then selected 'emboss'. Much to my delight(!) the nepeta in the foreground (which I plan to include and was dreading painting) looked just like textured acrylic gesso so the gesso will definitely play a part in this piece.

Art Nouveau? Needs a fancy graphic border.


I have a wonderful stone aggregate birdbath that didn't make it into the original photo. Ummm.....

I have not been updating my blog much lately but I have been working. Mostly I've been printing and packaging notecards for the Artists Market. Labor Day weekend is basically our last hoorah for tourist season, then art sales tend to drop off drastically during the winter and card sales have been really good this season. I also chose the photo I posted August 21st as a reference for a painting. I loved the comp, the lighting and I especially liked the silhouette of the grasshopper showing through one of the leaf blades. To me, it's little unexpected details like this that make a painting special. I've also played around with a couple of possible additions. See above.

Nick Simmons has mentioned several times that a painting will tell you what size it needs to be. In the case of the peacock orchids my usual working size of 16" x 20" wasn't going to cut it. Right now I estimate this painting will probably wind up taking roughly a full sheet....22" x 30". I've been itching to paint in a larger format lately but have been dragging my feet. I have nowhere to store this large of a painting, nothing to safely store it in and because my studio is so small, hardly any room to even paint it. Minor issues........

Wednesday, August 25, 2010

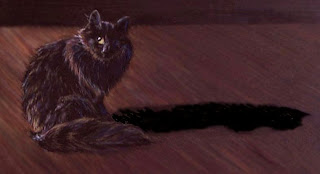
Gizmo the Cat

I couldn't resist...I brought out her inner lion.


If there's anything harder than photographing a black cat it's photographing a pastel or colored pencil piece on a black background. }:( This pencil painting is of Gizmo, my youngest cat who I have tried many times to photograph without success. She's all black and her fur just 'eats' light. She hates the camera and usually scowls when I point it in her direction but I got lucky the other night and managed to snap a halfway decent pose that I felt I could work with. I posted earlier, then took it down because I noticed the perspective was off on the flooring in the background. After correcting the problem I can NOT get another acceptable photo of this piece so I'm posting what I have, warts and all. If I can get an acceptable photo later I will repost.

This is done on black Artagain with Prismacolor colored pencils.

Monday, August 23, 2010

Peacock Orchids~subject study

Above is a more detailed life sketch, done yesterday when the weather was cooperating. I did it mostly to record the plant form but I think it has possibilities as a composition.

******************

Below is one of my life sketches with notes I took. Something I never noticed...the top most petal doesn't have the characteristic maroon markings of the other petals. If I had been given a pop quiz on this subject I would've failed. :(

Photo of the intricate 'braided' flowering stems. This year the peacock orchids have grown taller than usual...some topping 3 feet with as many as 10 blooms along the one main stem. With this many blooms on a stem the braided effect became very apparent and something I wanted to record for future reference.


A nice clear closeup of the anther and stamens...good to have.


The two images directly above...buds in various stages of opening.

As I was working out my drawing I realized I didn't know what my subject looked like from this angle. I didn't have a clear photo on hand at the time.


The other night I started making plans and doing sketches for a painting of peacock orchids. While sketching I realized I wasn't as familiar with these flowers as I originally thought. I've grown them for years but never really studied them. I was stumped as to how they looked from certain angles, how their stamens and anthers appeared, I had questions about the texture of the foliage, etc. so I decided to study my subject. I did several sketches from life, took notes and snapped multiple photos...long shots, closeups, super macros. I'm becoming so methodical lately. This is something I need to include in my process more often. If you work primarily from photos as I do you can't have too much information at hand. If at all possible take time to closely observe your subject/subjects, sketch, make notes and take lots photos from many different angles.

Saturday, August 21, 2010

White

A stand of peacock orchids among white nepeta in my Moongarden.

Peacock orchid~closeup

Hosta bloom

My gosh...has it been an entire week since I updated my blog?! Guess so!

I've decided I want to redo Pat's Sunflower in a larger format along with My Sunflowers but I've left these projects on the back burner for now for various reasons. I've been working with a lot of potent color lately so for a change I went into the garden this past week with my camera looking for something less colorful and what's the least colorful color but white. Actually white can be full of color, just not saturated color. Currently my Royal Standard green hostas are blooming. Normally I'm not crazy about hosta flowers. The stems are usually spindly and the flowers are an uninspiring shade of lavendar. The exception in my gardens are the Royal Standards. The stems are shorter and sturdier and the flowers are larger and more substantial plus they smell like lily-of-the-valley which I like. It's also bloomtime for the peacock orchids. I love these flowers and have painted them before. They make wonderful subjects. Now to decide which to paint.

Sunday, August 15, 2010

Pat's Sunflower~center reworked


This painting won't be going to market but I've sure had some fun with it. I used white acrylic gesso and dabbed it on the center of the flower with a small brush. My goal was to recover all the texture I lost in the first go-around. Today I went over the gesso with color. I didn't follow the reference too closely, instead putting various colors wherever I thought they looked good to me. I used a mixture of watercolor and fluid acrylic this time but stayed with the original palette. I truly like the results and would do this again, the next time a little wiser for my trouble.

Friday, August 13, 2010

Pat's Sunflower~Time to Start Over


Well, sometimes things work out and sometimes they don't. In this case, they didn't but I will post my results anyway. I made a vow awhile back that I would share my failures as well as my successes.

I wound up using fluid acrylics for the entire painting. I had the brilliant idea that I would create texture for the center of the flower with white acrylic gesso, then lay in my foundation colors...the yellows, reds, etc. When those were dry I then planned to go over the same area with a very dark color and quickly wipe away this same dark color from the more raised areas of the texture leaving the deeper color in the crevices creating contrast and definition. It was a sound plan but could've been better executed. I didn't create enough texture for my idea to be successful. I've been using this painting to experiment on so it isn't going to waste.

There was a time if I produced a failed painting it used to throw me for a loop. I was only as good an artist as my last painting. Today I see it as nothing more than a learning experience. Happily I can say that now and really mean it. Rather than questioning my abilities, berating myself and quickly tossing the painting in the bin to hide the evidence I study the problem and figure out what went wrong and how I can do things differently next time. No failure is a waste. There's something to be learned every time I put brush and paint to paper, no matter what the outcome.

Wednesday, August 11, 2010

Pat's Sunflowers~WIP continued


I transferred my drawing to Fabriano HP paper, then applied a layer of frisket film over top. I started cutting away areas of frisket and just kept going, basically deconstructing this sunflower. I have no idea if this will be a success or not but I had to try. I mixed up three containers of Da Vinci fluid acrylic...one with a mix of Phthalo blue/Hookers green, one with the same mixture plus Burnt Sienna added and the last with just Burnt Sienna, all diluted with water and I started pouring. I won't be able to update until Friday. My camera batteries died and they take 24 hours to fully recharge. In the meantime, I'll keep pouring and see what comes of it.

Tuesday, August 10, 2010

Pat's Sunflower~ WIP (quick update)


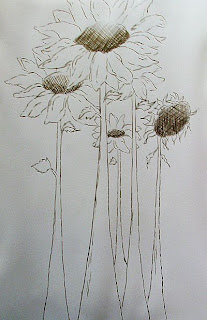
I haven't made much progress on this to date. I spent the better part of an hour just sorting out the tangle of sepals by adding values. I don't dare go further before transferring this to my working paper or I'll lose my line drawing completely. I could easily simplify these complicated areas but the wonderful spiky looking sepals, all curled and twisted, are one of my favorite features on a sunflower.

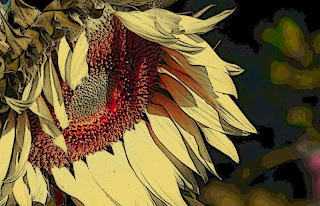
I'm still not sure exactly how I want to tackle this project either. After my alterations in Elements parts of this flower now look very graphic while other areas retained their organic aesthetic. I'm trying to figure out how I can combine the two approaches and still make it work.

Sunday, August 08, 2010

Pat's Sunflower~WIP

My line drawing w/beginnings of a value study

After I had my way with this flower in Elements 6.0

The original image..a real beauty :)

One of my Facebook friends, Pat was kind enough to share some photos of her sunflowers with me. I chose one of the images and put it into Elements, played with different crops, applied various filters and adjusted the colors. I finally came up with an image I like. I've just started working on the line drawing and value study. I'll be starting out with watercolor but I'm pretty sure this will wind up as a mixed media piece before it's over.

Wednesday, August 04, 2010

Sun Kings~Complete


The completed painting. The Zig marker is very shiny gold but I'm not sure that's apparent in this image.


I've removed the old frisket and placed a fresh piece over the crow. I then cut around the shape of the crow with an Exacto knife, removed the cutout and went over the exposed paper with black marker. I peeled off the rest of the frisket when the marker was dry and Voila! A black crow.

....I think. I'm really not sure if this needs something more or not. I'll have to look at it for a few days before I decide. I completed the crows and I love them. I'm wondering if I need to add more. I wound up removing the Frisket film from the crows, laying on a fresh piece of Frisket, creating a stencil of sorts with my Exacto knife, then coloring in the shapes with a permanent Sharpie. I also used black marker to color in gaps in the wax on the flower centers. I used my gold metallic Zig Painty to embellish the flowers, one stem and to paint all the leaves. Zig Paintys will mark over just about anything because they are oil based and they went over the paraffin very well.

Tuesday, August 03, 2010

Sun Kings~WIP

This is the result after another 4 pours, two with Pyrrol red, another just Indian yellow and one with a mixture of both.

The first pour which was just Indian yellow. I used Frisket film to protect my crows.

My wax 'pencils' which I carved out of a block of paraffin with an Exacto knife. I went over all the gold metallic pencil lines with the wax before starting my pours.

It's hard to tell from this image but here I've gone over all the lines with the gold metallic pencil.

My original drawing

I decided to stay with sunflowers for my next project so I came up with a more stylized version. I made my sketch on drawing paper, enlarged it and transferred it to #140 Fabriano HP paper. I played around in Elements with an image of my drawing first to get some ideas regarding colors. After trying out a few possible palettes I settled on DR Indian yellow and DS Pyrrol red.

Once the drawing was transferred to my working paper I went over all the lines with my metallic gold Prismacolor pencil. I chose to do simple crosshatching for the flower's centers. I had a certain effect in mind and decided to experiment with paraffin wax as a resist. No special wax, just the stuff you melt to seal jelly jars. It worked but I found I had to be careful not to use a synthetic bristle brush over it or the wax would rub off. Conclusion? Pouring was my best option. I am using a squirrel hair mop to very gently guide the paint only when absolutely necessary and so far the wax is staying put.

Intention: I want to create the illusion of great size and height for these sunflowers so I added some crows, not only for suggested scale but also because I think crows are cool and they go well with sunflowers. I drew a few outlines of crows on tracing paper so I could see where to place them in the composition. As the crows were on tracing paper, it was also possible to flip the line drawings over to change the direction of the crow's outline giving me more options.