Translate

Sunday, May 30, 2010

Sydney~WIP 2


I've been working on this portrait for three solid days now. Unfortunately, my first attempt ended in failure. I was well into the painting when I realized my subject was too small for the size of the format. I've never pulled that stunt before and hope to never have it happen again. Thank God for my scanner and it's ability to enlarge drawings. What a time saver.

Yesterday I realized I wasn't happy with the fur. A Golden's fur tends to have lots of wispy waves and it just wasn't happening for me with the paint so I got out my pastels again. The nice thing about adding soft pastels to a watercolor...you can go back in over the pastel with the paint to bring back that vibrancy if things are begining to look a little dull. I'll probably have some colored pencil in this before it's over.

Tuesday, May 25, 2010

Establishing Color & Values with Pastel


Colorful, isn't she?


Here I've greyscaled my pastel to double check the values. Notice the arrow I've drawn to indicate my light source. Ummm...the center top of the head looks too dark. Needs tweaking.

I originally planned to print out a copy of my sketch onto cardstock and use pencil and charcoal to determine placement of the appropriate values for Sydney's portrait. Then I had the brilliant idea to get out my soft pastels and experiment with those instead. I had forgotten how messy soft pastels are and how fun they are to work with.:) Cardstock is not a good support for soft pastels and I struggled to not wipe them completely off the surface when I tried to blend them. I did the best I could but wound up digitally enhancing my results to get the color saturation I wanted.

Monday, May 24, 2010

Sydney the Golden Retriever~WIP


From looking at the other photos of Sydney I noticed her eyes were quite large so I increased the size here which also worked to lessen the distortion. I enlarged the width of the top of her head, too. I also fixed the flash bulb eyes. Now to sort out the light source.


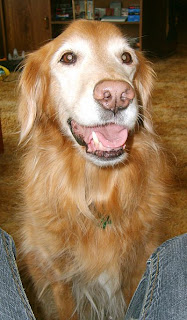
My working reference photo

My niece Kali's Golden Retriever, Sydney recently passed away quite unexpectedly and she requested a portrait. She had some nice large file photos of Sydney for me to reference which will help greatly. She also hoped I could paint Sydney with her mouth open which apparently was her normal expression. We had a Golden when the kids were little and he always had his mouth open in a perpetual goofy grin so it must be a Golden 'thing'. Kali provided me with one shot of her dog with her mouth open but the camera distortion wasn't going to make a nice portrait IMO so I'm sorting that problem out first. The photo was taken fairly close to the dog's face making the nose look too large, the eyes and head too small. It was also taken indoors with a flash so I'd like to change the light source. I don't want to lose the angle of the shot completely, just lessen it a bit.

This is a very rough sketch and I'm posting it mainly for my own purposes. I can spot things on screen I often miss IRL.

Sunday, May 23, 2010

Crabby Cat Birthday


Crabby Cat first appeared this past Christmas and I thought it would be fun to bring him back for another holiday, this time a more personal day. I adore cats with lots of 'catitude' so when I saw Mefisto, a Maine Coon owned by MaLu on Paint My Photo I was inspired to create a birthday card. I'd like to extend my apologies to Mefisto for turning him into a Persian and adding the party elements. Mefisto is a gorgeous black & white Maine Coon with loads of attitude and I just couldn't resist.

I used the same method to create C C Birthday as I did C C Xmas. I drew my outline onto tracing paper, transferred the image onto card stock, scanned it and then printed it directly onto 140# HP watercolor paper. I went over the outline with a 05 Micron pen, then added the color using a combination of Prismacolor CP's and watercolor and I will be turning this into notecards again. I did learn one lesson from C C Xmas...I drew in my own text this time because I was not happy with the way the text printed out that I added using my photo editor.

Saturday, May 15, 2010

Life


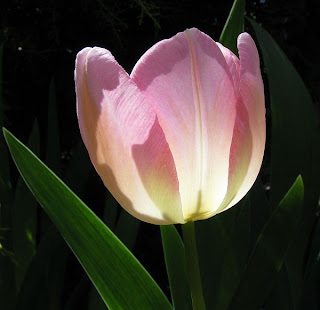
Tulip 'New Design' macro shot.


I planted the New Design tulips below my pink weeping cherry tree because they bloom at the same time and match the blossoms and newly emerging pale green leaves of the tree. Clever of me...huh? ;)


My weeping cherry blossoms in their prime.


Just when I was at my lowest today look what I found...a morel! It was growing in one of my flower beds. This is a first and it was certainly a morale booster. (pun intended)

I've recently let life get in my way rather than go with the flow and my creativity has suffered partially because of my choices. For instance, this time of year I'm usually complaining about Spring cleaning the house but this year my gardens have gotten the better of me. The past few years I haven't been as diligent as I should've about clearing grass out of my flower beds. This year I'm reaping the rewards(?) of that oversight and frankly I'm feeling overwhelmed at the moment. Why does grass grow so well where it shouldn't and never where it should?! It also occurred to me today as I was tearing up clump after clump of grass how short a time it would take to undo all the blood, sweat and years I've spent creating these beds. Mother Nature could turn my usually well manicured flower gardens into a wild meadow without breaking a nail. On the bright side, I managed to get some nice photos to share.

Saturday, May 08, 2010

Batik Tulips~Completed


Ta Da! It's finally done. Last night I removed all the tape and finished the centers of the tulips. Today I looked at it and thought I could've done a better job on the tulip in the lower left corner so I retaped a few areas and applied another light wash. I got some very nice bleeds on the tulip and the background and thoroughly enjoyed this process. I would definitely try this again. It's a bit tedious applying the tape but more fun than a chore. Kudos to Sandy Maudlin for creating this technique.

Friday, May 07, 2010

Batik Tulips~Update 2


Here I've applied my dark wash over everything. I used Indigo as a base color. I added some Phthalo green in a few areas, perm. yellow in others to get a mix of warm and cool.


Everything is now covered in masking tape. This process was actually fun! Kinda like putting a jigsaw puzzle together.


I masked off some leaves and one bud and here I've removed the tape from those areas so I can put even more tape on.


I had hopes of completing this today but it seems like it's taking forever to dry. The tape as well as the paper has absorbed a lot of moisture and it's a bit humid here today so I'll just have to wait...but it's hard. I'm dying to start tearing off tape to see what's underneath.

Thursday, May 06, 2010

Batik Tulips~1st Update


I'd call this the ugly stage. Every painting seems to go through at least one. I've added color and now I'm beginning to add more tape. Then more color, more tape and so on. It's my understanding that before it's completed the entire piece of paper will be covered in masking tape. I will reiterate...I have no idea what I'm doing. I'll add that I also have no idea what my end result will be. I think it's going to be like opening a present on Xmas morning...a nice surprise or a big letdown. I'm still excited to what happens either way.

Wednesday, May 05, 2010

Batik Tulips~WIP


This is as far as I got before the big 'boom' and the flames. I used artist's tape to mask the areas I wish to keep white in hopes it will not allow any bleed as I add the next layers of color. I will be switching to a regular brand of masking tape to complete the painting. Bleeds will be desirable now. Just a note: I really have no idea what I'm doing yet. This should be interesting.


My working drawing.


Here I ramped up the contrast in my photo editor and greyscaled the image to get a better handle on the values.


This is a crop of a photo submitted by Lorenz on Paint My Photo. I cropped it quite a bit to create a macro.


I've been so impressed by Sandy Maudlin's masking tape batik watercolor paintings I decided to try my hand at it. See Sandy's batik poppy Here and the work of some of her students Here.

I chose to try tulips as my first subjects. Fairly simple shapes to contend with. For my reference I'm using a photo submitted by Lorenz on Paint My Photo, a site I found and joined through Facebook where photographers and artists share their work without worries of copyright violation. I haven't gotten very far yet as my hair dryer decided to burst into flames when I was drying the first wash so until I replace it, it'll be slow going.