Translate

Sunday, August 30, 2009

Working Out The Poppy


I put the image of the poppy that I 'twirled' back into Elements and cropped it into a square format. Then I used the Ink Outlined filter set at 17-Stroke Length, 25-Dark Intensity and 37-Light Intensity and got some very interesting results which I chose to save for reference. It was still missing something so using the brush stroke feature I dropped turquoise into some of the deeper midtones to bring in a contrasting color. Looking at the image on screen, I think the turquoise needs to be brighter as it's not showing up well enough. (Btw, forgive my crude brush technique. I'm not terribly steady with my computer mouse.) It's becoming more abstract with every change. The trick for me will be to bring this to fruition with brush on paper.

Saturday, August 29, 2009

Just Checking In

My sketch book is anything I have handy that will accept pencil or ink. This is my sketch of Gizmo or Lil 'Mo as we sometimes call her. I'm also scheduled for a haircut on Monday as you can see. :D

I haven't posted anything new on my blog for a week...more(?) so I thought I'd check in. I began working on a new project last Tuesday. I planned another floral, this time on gessoed paper. I was full of wonderful ideas I was sure would work. I wanted to do a spin (no pun intended) on the twirled poppy I created in Elements. Using gold and white tissue paper I found among my Christmas 'stuff', the idea was to embed it in the gesso and manipulate it to create the desired texture and form I envisioned. Also I had a specific finished size in mind (24" x 24" matted and framed) so I needed my paper cut to at least 19" x 19". After cutting my paper I realized I didn't have a board big enough to tape it on so I covered a large piece of cardboard I had saved (I knew I'd need that one day!) with clear contact paper and got everything ready to gesso.

I had to place the papered board on my studio floor because my space is very limited. This was at night when I'm usually the most creative and it was pouring rain outside. I'm terribly messy when I apply gesso and it seems to get everywhere no matter how careful I try to be. In the midst of applying the gesso my neighbor, Joe began knocking on my door and told me I had left my interior lights on in my car. Knowing I hadn't been in my car since the day before, the fear that my battery was probably ready to die was a real possiblity. With both of us standing outside in the rain it was eventually discovered that the hatch on my Suburu Outback wasn't latching properly which in turn kept the interior lights from shutting off. Who knew? Anyway, with Joe's help we solved the crisis, the battery was still ok and neither of us melted in the rain. Of course I got gesso everywhere which had to be cleaned up.

Afterwards I came in and added the tissue paper to the gesso. It didn't cooperate as planned so had to be removed and thrown out. What a gloppy mess.:( Left to create the needed texture anyway I could, I tried my best to do it with my fingers. I felt like I was back in kindergarten playing in the finger paints only the final results weren't as pleasing to the eye. I now have a very large board with an equally large piece of gesso covered paper lying on my kitchen table waiting for me to figure out "what next ?". I'll sort it out eventually and have every confidence I will triumph in the end and produce a lovely floral which I'll post on completion.

In the meantime I managed to catch Gizmo, my female cat holding still long enough to actually sketch. Will wonders never cease! She's the skittish kitty that inspired Undercover Kitty. At 14 yrs. of age, Gizmo has never weighed more than 7-8 pounds and bolts at the sound of a pin drop. Her ears and eyes are disproportionately large for her rather small face and her fur is long and the color of a double expresso. I've never been successful at photographing her so I was thrilled she sat long enough for the sketch. She may very well be the subject of my next painting while I sort out the gesso issue.

Friday, August 21, 2009

Fun With Elements 6.0~Pt. 3

Kinda cool...huh?


Using the slide indicator below Angle you can adjust the amount of twist desired.

Now for a new twist...literally. With the same image I selected the 'Twirl' filter from the effects menu. I'm not sure what I would ever do with the results of this particular effect but you never know.

Fun With Elements 6.0~Pt. 2


Using the same original image I selected 'Solarize' from the effects menu. The results look something like an oil slick on water. I converted the solarized image to black and white and discovered this is a great way to isolate the basic shapes and light patterns in an image. Even though it's now in black and white I was still able to adjust the appearance of the image by using the color slide bars you see at the bottom of the Elements window.

Fun With Elements 6.0~Pt. 1

Even smaller cells! The image almost looks fluffy now.

The same image with smaller cells.

For my first try I selected fairly large cells which created a very abstract effect.


From the effects menu I chose 'Crystallize'. As you can see, the size of the 'cells' or facets can be selected by moving the slide indicator back and forth.


Original Image


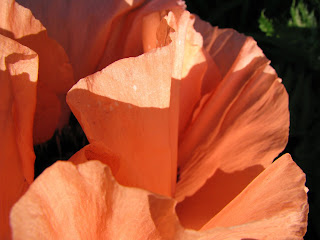
In hunting for a suitable reference for my next floral, I ran across the photo of a poppy I took earlier this summer. It's a lousy photo but I saved it because it had some interesting light patterns going on. I took the photo just before sundown when poppies tend to start closing up their petals and combined with the light, created an abstract image of sorts. Last night I put this image into Elements and started playing around.

Tuesday, August 18, 2009

Maine Coon Kitten~Completed

Maine Coon Kitten on Arches 140# HP paper
Dimensions: 11" x 15"
SOLD

Sorry for taking so long to post the finished piece. The paper was buckled from the poured background so I wet the back down and placed it under a piece of foamcore covered in clear contact paper and heavy books to smooth things out. It took three days to dry because the weather has been so humid lately. Today the humidity has finally come down, the paper is completely dry and I did my final corrections. The colors are a little off and the markings on his head aren't as dark as they appear in the image.


If I had known how much fiddling I would be doing to this one I'd never have done it on HP w/c paper. It just won't take the abuse. As a consequence, it looks a bit overworked IRL for my taste. In retrospect I might have 'rethunk' my palette as well. It would've worked on a more loose style painting but started to look muddy the more I went back in to adjust. As much as I hate retreading old ground, so to speak, I may just have to do this one over again and loosen things up a lot.

Friday, August 14, 2009

Maine Coon Kitten~WIP 3


I went as far as I could on the kitten before adding the background. I'd like some of the fur on the ears and head to extend over the background color so it was time to decide exactly what kind of a background suited this fella. I did a little research on Maine Coon cats and learned that their coats have evolved to accomodate cold weather conditions. I decided to create a winter-like setting by mixing up some winter colors, in this case Payne's grey with FUB, and doing a wash which turned into more of a controlled pour. I tilted my board on a 45° angle and did the left side first with the painting turned upside down. When that was dry I did the same thing on the right side with the board right side up so as not to disturb the paint on the kitten. I threw a bit of salt on while the paint was still wet to add some snowflakes and Voila! Windy winter sky. The results are subtle and not as grey as they appear in the image.

In my last post I mentioned that I wanted to increase some of the values, mostly on the stripes in the fur. There's obviously some overkill in a few areas so I will have to adjust the other stripes accordingly. There's work left to do on the ears and head and some tweaking to do on the exterior of the body.

Wednesday, August 12, 2009

Maine Coon Kitten~WIP 2


As you can see, I've completed the eyes and most of the facial detail. Now comes the really fun part. I've begun working with this one in a vertical position, holding my brush further down the handle as an oil painter might, laying in color and washing it down with an atomizer bottle filled with water. This produces the effect of soft, fluffy kitten fur. I plan to go back in with more saturated color to define the stripes better in a few places and also to produce more variation in values. The outermost body and head of the kitten will eventually be defined by the background color.


So far my palette has consisted of FUB, burnt sienna and yellow ochre. FUB and burnt sienna make the best warm darks and diluted(with a touch more FUB added)also produces a wonderful lavendar grey.

Tuesday, August 11, 2009

Maine Coon Kitten~WIP

As you can see, I have a ways to go yet. I don't really want to get into too much detail on this one but it won't be as loose as the others. Closeup of the face. Notice the eye color is so similar to a dog's. Btw, I haven't removed the masking yet.

I'm taking a big chance and posting a WIP that's actually still in progress. I don't normally do that. I have no idea if this little guy will turn out to my satisfaction but I couldn't resist posting a quick update. Last week was a busy one for me. Two trips to the printers that take half a day each, shopping to do(and I hate grocery shopping}:( ), getting work ready to deliver to the gallery...blah, blah. Anyway, not much painting went on around here. I had planned to do another dog but I kept coming back to a reference photo of a Maine Coon kitten, submitted by SNAG on WC. Finally I gave in and started painting it. This one won't be as loose as the others. IMO, it demands a bit more detail and time.


Tracey Costescu(see her blog link on my link list!)kindly gave me some pointers on using the masque pen and I've now made friends with the thing. It sure came in handy on this project because Maine Coons have lots of whiskers and an abundance of hair sprouting around their ears. I also noticed as I was painting that Maine Coons have eyes a lot like dog eyes so the timing on this was perfect. I hesitated to use mask on the catchlights in the eyes. I just don't like the results and avoid it whenever possible. However, I knew I'd be spraying water on this as I went along so I had to preserve the lights somehow. While doing the previous several animal paintings I discovered if I paint around the catchlights first, then apply my masking fluid allowing it to extend a tiny bit over the nearby color, I don't get that really hard edge. The masking fluid will lift some color when it's removed so the result is a softer, more natural catchlight.

Sunday, August 02, 2009

Bassett Hound

SOLD


Here's my bassett hound. The reference photo I used is from the WC RIL, courtesy of Bigs. I'm not sure I'm happy with the background yet. It may require further tweaking. I may change the crop, too. Not sure yet. He's certainly colorful, isn't he? This is also painted on Arches 140# HP w/c paper. The dimensions are still to be determined.