Translate

Saturday, December 31, 2016

A Brand New Year ~~~


I want to wish all my followers, subscribers and occasional visitors all the best in the coming new year and thank you all for your support and interest in my art. A special thanks to those who took the time to post comments. It means a great deal to me.

Truthfully tomorrow is just another Sunday, me thinks but it can represent a fresh start, too. I'm not sure just how much I accomplished in 2016 but it was a much healthier year for me and I think I may have grown up (at least a little) as an artist. Something has shifted in my inner ether. It's hard to articulate. It's just a feeling, an attitude change. I'm excited to see where it leads me...really excited. In the mean time I've been busy painting collage papers and going through old magazines tearing out photos. I'll be posting an update soon. See you in 2017.

Saturday, December 24, 2016

'Tis The Season

To all my visitors....

Thursday, December 22, 2016

A Touch of Spring


My best friend's birthday is a week before Christmas and I wanted to make her a special card as usual and every year I wrack my brain to come up with something new. This year it was easy. Winter, although just getting started has been unusually brutal so something Spring-like was in order. Flowers but no poinsettias here...uh uh.

This is a new technique I picked up on Youtube. It's fairly simple but I've found it does take a little practice. Lay down a colorful layer of paint and pattern using colors on the darker side. Nothing pastel. When dry seal to protect the layer. I used matte gel medium. Make sure the matte medium is thoroughly dry before adding the last layer. I used white acrylic. Allow to dry for just a minute then scrap away the top coat to reveal the paint underneath. Voila! 

Friday, December 16, 2016

Christmas Cards 2016


I'm actually making some Xmas cards this year. It's been a few years since I made them. Not sure how many, I'll have to check. Anyhoo, this a sampling of my work thus far. Lots of collaging, stenciling, painting, inking, stamping...you name it. This sort of thing does not come natural to me, I'm discovering. I watched numerous videos on Youtube of artists whipping together these amazingly creative gems of art full of energy and fun and almost childlike exuberance. However when I faced the proverbial blank piece of paper I agonized over placement, color, intent...I took the fun right out of it. Not to mention that I'm short on technique when it comes to some of these materials. Sadly, lack of confidence always shows. Still I persevered and things haven't turned out so bad after all.  Merry Christmas!

Just starting out

The aftermath. Yikes

Sunday, December 11, 2016

Christmas Bird ~ mixed media


This is my rendition of a Christmas bird. Trust me, it's one of a kind. I tried several ideas out on this little birdie while in the process. For instance, I added quilted fabric to his body. I found an old pillow sham which was sacrificed for the cause. Also I dipped into my vast collection of bird feathers and used those to embellish the breast. I created a makeshift piping bag from a plastic storage bag and piped the branch with modeling paste. I used my waxed paper faux batik technique to make the leaves and the tail and wing feathers. Walnut ink was used to tone the waxed paper rather than India ink and the background was also toned with walnut ink. Hope you like. I like it.

Wednesday, October 26, 2016

Working on Canvas


Using Ohmyprints Wall App

This is a new surface for me and I'm liking it more than I thought I would. A few years ago I picked up a box of 9"x12" canvases on sale on Jerrys Artarama . I played around with two, then decided I didn't care for the texture of the canvas and so they were all set aside. Recently I've had a change of heart and suddenly find myself excited to have pristine canvases awaiting my brush. This is my first successful painting on canvas and I love the idea that I can simply hang it up. No trip to the framers, no ordering framing supplies...nada. Love that!

I've chosen to do something more creative this time. More from my own imagination and purely decorative. Here I've shown the painting in a home environment using Ohmyprints WallApp . I used heavy and soft body acrylic paint, flexible modeling paste and dried maple leaves.

Tuesday, October 04, 2016

Park Life 2 ~ collage


Although I haven't posted lately I have been working. I took my sweet time and spent three weeks creating this fun little piece of cut paper collage, gesso, charcoal and acrylic paint on paper. It's based loosely on the actual park I live in as viewed from the lake which the park overlooks. I surprised myself that I not only was able to cut all those teeny tiny little pieces of paper without tearing my hair out or losing interest but that I enjoyed the process. I Zen-ed out! It helped that I created more comfortable seating for myself. That is SO important for any artist, to be comfortable while creating. If anyone finds themselves balking at have a good sit down at their easels ask yourselves if your chair isn't comfortable anymore. They do wear out, you know.

Note: I received a lovely email from the woman that commissioned the portrait of the cats. The birthday girl was very happy with the painting and sent a photo of it matted and framed. I'm posting that image with her permission.


Sunday, September 18, 2016

Painting What I Know ~ The Trailer Park


This is one subject that until this past month hasn't seemed to inspire me and I'm not sure why. I've lived in this park for over 20 years now. I actually lived down here for a short time in the mid 70's with my husband and my first son. My youngest son was born here. Well, while we lived here. Then we moved on like most folks that live in these parks but I never forgot how much I enjoyed park life. I returned in the mid 90's and the rest is history. This particular park sits right above Lake Charlevoix with lake access for the park residents. Lot rent is reasonable and that's saying something in Charlevoix, believe me!

My intention at this time is to...ummmm...I'm not sure what my intention is. I think I'll let it come to me as I go along. Maybe I'll chronicle the features of the place that stand out to me most. I'm talking series here. I know this was the intent with this piece. The trailers are set along a drive that is terraced. The drop to the lower terrace is extremely steep so the drive out is equally steep. Along the way are all the lovely speed bumps. Try going over those while in labor. Not fun but I digress. Using acrylic paint, cut paper collage, graphite and gesso I've tried to portray the scene of the hill in early morning. I was walking a fine line between concept piece and illustration but think I may have fallen off into illustration. I'll let my visitors be the judge. Chime in if you wish.

Sunday, August 28, 2016

Daniel Smith Cobalt Teal & The New Black


I've just completed a commissioned painting, a four cat portrait for their human Mom's birthday. I took photos along the way and I've gotten permission from my client to post the WIP on my blog.

I want to give a shout out to Daniel Smith for their fabulous Quinacridones. I doubt I could've achieved the results I did without them. Quin. Burnt Orange is perfect for orange kitty fur and a few flourishes of Quin. Violet bump it up another notch. One of the cats was predominately grey and black so I went with Quin. Sienna and Indigo for my black mix. I normally use burnt sienna but no more. I was thrilled with the black the Quin. Sienna produced. Very clean and rich and it watered down to a nice neutral grey. But grey is still grey and it needs help. This is where the Cobalt Teal came into play. I had planned to use it in the background so I needed to work it into the cats somehow. I added a light glaze on the grey fur and wow! That grey came to life! It was one of those ah HA! moments I love. It never gets old. I'm happy, my client is happy...now I hope the birthday girl will be happy.

Monday, August 15, 2016

Yummy Greens


A feast for the eyes yummy. I tried to capture the rainy day shades of green in the park. So lush almost like another world. The weatherman is calling for more rain even though the sun is shining at the moment. I'm looking forward to it now.

Saturday, August 13, 2016

Drawing a Rainy Day Away


It's been raining here for the past two days. I'm not complaining(!) because we really do need this but the gloom does get to me. I went a surfin' on the web and was inspired to pick up a drawing utensil(in this case a Micron 05 pen)and draw the scene directly out my front windows. It's something I look at every time I sit down on my sofa and I could do an entire series on that one little view. It offers several species of trees, one that produces berries, and wild shrubs, weeds and grasses. The various shades of green are stunning at the moment. No wonder green is my favorite color.  

Thursday, August 11, 2016

Roof Patrol


Here's my latest acrylic. It's 5" x 7". I darn near went blind painting it, too. Well, that's a slight exaggeration but it's a lot of tiny details for me. It looks much better at a distance.

Photo courtesy of Lorenz on PMP

Sunday, August 07, 2016

Frame Cards


My latest acrylic painting. No title yet but I was in the mood for tulips. Wait! There's the title!


I'm trying something new at the moment. Paintings don't seem to be moving this summer at the gallery but card sales are up. The trouble is there is not as much profit to be had so I need to get creative in more ways than one. I recently ordered a box of frame cards w/envelopes from Clearbags  and I'm working on more 5" x 7" paintings to frame in these little cards. They look quite nice when completed. Now we'll see if folks are willing to pay $20 for a card with an original piece of artwork  included. I have some customized stickers I ordered from Zazzle last year that I will apply to the back of the cards to personalize them even more. 

Wednesday, July 27, 2016

Revisions


I've spent the last couple of weekends tweaking some older paintings and completely redoing one. I rarely do this(read never) so something has shifted in my brain. I do believe I've learned a few things (finally!!)so I actually had solutions to problems these paintings presented at the time of their completion(?). I redid the trilliums but truthfully I may like the first version better. I did think the first painting looked a bit sloppy but now it's looking more painterly. Anyhoo, one painting I was extremely happy to rescue was the Great Dane. Loved the dog, hated the background. At the time I was totally stumped as how to handle it so the outcome was pretty bad. This past weekend the solution was obvious. Another painting just needed more warmth. Yet another needed deeper shadows. I'm on a roll.

Thursday, July 07, 2016

Trilliums 2 ~ complete


Here is my finished painting. Like I mentioned in my previous post, this is a new style for me but I thoroughly enjoyed working this way and will definitely pursue this same style in the future. Looking at the painting now I wish I had spent more time on the white petals. White flowers provide a great opportunity to exercise our ability to observe and see color where our minds say there should be none. White is really a very colorful color!
two tulips I rescued from the lawn mower

Sunday, July 03, 2016

Trilliums Again

A portion of the transfer
Portion #2

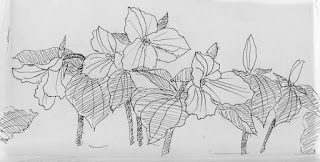
This is the final sketch.


Storyboarding...this is a method I employ using individual drawings on tracing paper and arranging them to create a pleasing composition. It works great and I'm too cheap to buy another version of Adobe Elements.


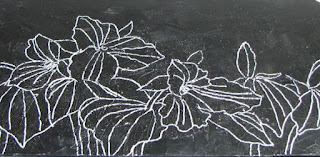
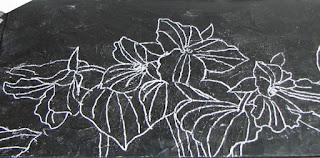
This time I'm putting a new spin on things. This style is new to me and I'm not sure how it will turn out but why let that stop me, huh? I've put down a coat of acrylic gesso on matboard to add an element of texture, let that dry and then painted the surface with black acrylic paint. I transferred my drawing with white transfer paper and things are now ready for color. I plan to use a palette of soft greens and blues but that may change depending on how it's looking in process. Wish me luck!

Friday, July 01, 2016

Morels 2 ~ complete


And here is the finished painting all float mounted and framed and ready for a buyer. If you like what you see let me know. If not this will probably go to the gallery. In the meantime I've started work on the next work of art. This time I think I'll be painting trilliums and I've got an interesting palette chosen. Actually it's a entirely new approach, new to me that is.

Thursday, June 30, 2016

Morels WIP 2


A quick update on this project. I chose a palette of DS Quin. Burnt Orange, DS Quin. Sienna, olive green, DS Undersea green, warm sepia, Phthalo blue and Perm yellow. I wanted more saturated color for this morel painting. After the painting was complete I added copper metallic paste here and there for a more exciting effect. I used my finger to apply. This stuff is new in my tool kit and I love it. I used the paste primarily to highlight all the yummy textures. I just finished giving the painting a light coat of Krylon spray varnish and when it's dry I will add the 'feet' to the back of my substrate as I plan to float mount this in my frame.

In this image you can see my collection of metallic pastes.

I tried spring green on for 'size' but quickly nixed that idea. Love the remaining colors.

Monday, June 27, 2016

Morels and Bookmarks


I've got two 11" x 14" shadow boxes that I've wanted to use for paintings so I chose to use morel mushrooms for my subject, at least in one of the boxes. I'm taking a similar approach to a painting I created back in 2011. I've coated a piece of matboard with Liquitex gesso and added bits of leaves and twigs to replicate a forest floor. I also coated some oak leaves I saved from last Fall. Oak leaves are the best leaves I've found for this application because they are sturdy and pliable, even when dried. I will attach those with gel medium. I also tried out a new medium...string gel. I used it to form the mushrooms and give them a 3D appearance. The string gel was surprisingly easy to work with and I can imagine all sorts of projects I could use it for.

I found myself with lots of scrap Yupo and I hate wasting art materials so I made about a dozen bookmarks with the bits and pieces. I think they turned out rather well!

Saturday, June 18, 2016

Maggie


This is Maggie, a beloved pet who belonged to my friend Mike. I had been telling Mike I'd paint her portrait for him but his only photo of her wasn't the best reference. I finally decided there was enough info in the photo to give it a go and after asking Mike a few questions about her to fill in the blanks here is my result.

I have been admiring Vickie Nelson's animal portraits on Facebook lately so I wanted to apply a similar treatment to the background in Maggie's portrait. Vickie isn't shy when it comes to backgrounds often going so far as to surround her critters in vibrant, colorful abstraction. It shouldn't work but it does. The subject doesn't seem to get lost but becomes a part of the whole composition. Rather than a BG that gets slapped on at the last moment to keep the main subject from looking so lonely on the paper it becomes a stage for that particular pet's favorite toys, a favorite blanket or just a bunch of colorful shapes, patterns and/or textures. Anyhoo, I love the look so I tried it on Maggie. Mike told me she loved to ride in the car so I gave her a '57' Chevy-ish car all her own. I think it suits her.

Tuesday, May 31, 2016

Trilliums in Bloom


Love the neat texture. It adds so much interest.
With the plastic wrap in place. I saved my whites with liquid fisket.

The woods around these parts are currently carpeted in wild trilliums and it's a glorious sight.  I wanted to pay tribute to this flower that blooms for such a short time, often alongside wild forget-me-nots, with a small painting.

I pulled out a trick I haven't tried in years...saran wrap aka plastic wrap. It's a cool way to add some interesting effects/texture.  Simply cut pieces of the wrap and place on your wet paint. Make sure the paint is really wet or nothing will happen. You can then manipulate the wrap any way you wish. Also don't remove the wrap until the paint is thoroughly dry or all your lovely textures could be lost. By adding the forget-me-nots I was able to try out my new tube of watercolor, Periwinkle by American Journey.

Saturday, May 21, 2016

Back to the Drawing Board


Sorry for the lapse in updates. My flamingos fell by the wayside when my COPD flared again this Spring. Seems it's become an annual event. While recovering I needed to avoid the alcohol ink fumes so I completed a commission for a long time friend, a watercolor painting of a lady slipper I've been promising her for yeeears, and also a few pencil sketches for myself. I forget to simply draw something for my own pleasure. I enjoy it and don't know why I don't do it more often. I need to remedy that.
This gal is strickly from my imagination.

The receptionist at my doctor's office.
Lovely girl.
She has a perfectly oval face.


Friday, April 29, 2016

Feeling Flamingos


I feel like painting flamingos, that is. I've been mulling this idea over all week and finally did a quick line drawing. I found a few references photos on PaintMyPhoto and worked with those as best I could. My plan so far is to work on Yupo with alcohol ink and collage. I'll be making my own collage paper so I'll have to sort out my colors, etc. The birds will probably be done with acrylic paint similar to the cats on Lunch Rush at Chez Dumpsta'. 

I'll be posting updates so stay tuned.....

Wednesday, April 20, 2016

Something Different


A little something different from me. I dreamed this one up...literally. The composition and the colors. I just wish I could get the colors to show true. For those that are familiar with Adirondack's 'Willow' alcohol ink that's the color in the sky, not Pesto green. I hate when these things happen. It's the funky 'Willow' green that makes the painting work IMO. Ah well....

This is another small work...5" x 7" on Yupo. I added some cut paper collage and flexible modeling paste. For the patterns in the white and red areas I painted over the alcohol ink when it was dry with black acrylic paint, then used an old credit card I had notched and dragged that through the wet paint until I was satisfied with the results. Voila! 

Saturday, April 16, 2016

Varnish Day


It finally warmed up here at long last, warm enough to spray varnish outdoors. I sprayed my latest ink paintings including my bug series in batches and they are now curing before they will be mounted, matted and slipped into acetate envelopes. I belong to an inking group on Facebook and there seemed to be some confusion as to what varnishes work best on alcohol ink. Up until just lately I was using Krylon Gallery Series UV Archival gloss spray but I've found that Krylon's UV-Resistant Clear gloss works just as well and cost much less. One member of the ink group had heard that the gloss spray would disturb the ink but I found that it's simply not true.